
Object IDs
Redshift gives an object an ID through its RS Object tag: switch on the tag’s Object ID override and give it a number. The OBJECT IDs pane lists every such tag in the scene.
What’s listed
Section titled “What’s listed”A row appears for every RS Object tag whose Object ID override is on and whose ID is 1 or more. An object with two RS Object tags has two rows. Each row shows:
- Object — the object the tag is on.
- RS Tag — the tag’s name.
- ID — its Object ID.
A tag with the override switched off, or an ID of 0, isn’t listed — unless you select it (see below).
Setting IDs on your selection
Section titled “Setting IDs on your selection”Set selected to: writes an ID to what is selected in the Object Manager:
- a selected object — every RS Object tag on it. If it has none, a new RS Object tag is added;
- a selected RS Object tag — that tag;
- any other tag you select counts as its object.
Type the ID and click Set. The ID is written and the tag’s Object ID override is switched on.
With more than one object or tag selected, the panel asks how to number them:
- Same ID — all of them get your number, so they share one matte.
- Unique IDs — your number for the first, then counting up, skipping any ID another object already uses, so the new IDs don’t merge into existing mattes.
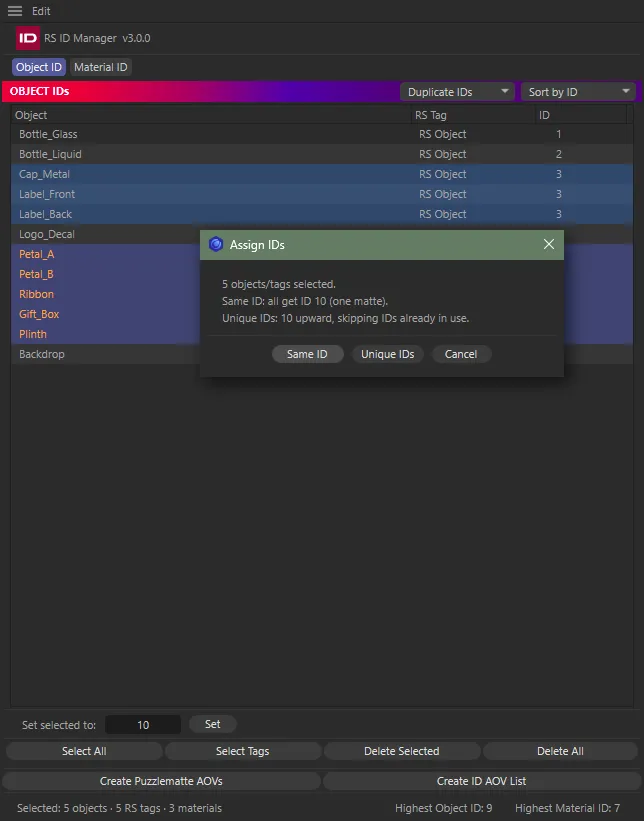
IDs run from 0 to 100,000,000. Setting 0 switches the override off on the selected tags (and adds no new tags), so they drop out of the list. Every change can be undone with Edit ▸ Undo.
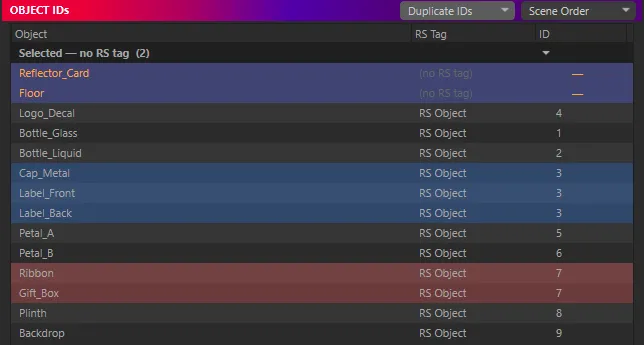
Selected objects with no ID yet
Section titled “Selected objects with no ID yet”Objects you select that have no RS Object tag show at the top of the list, greyed, under Selected — no RS tag. Selected tags whose override is off or whose ID is 0 show under Selected — RS tag, no ID. Their ID reads —. They are there so you can see everything Set is about to write to.
Editing a row
Section titled “Editing a row”- Double-click the ID and type a new one, as you would rename an object in the Object Manager. If the row is one of several highlighted rows, the new ID goes to all of them, through Set — so you are asked Same ID or Unique IDs.
- Double-click the RS Tag name to rename the tag. When the row is highlighted, every highlighted row’s tag is renamed. An empty name resets it to RS Object Tag.
- Double-click the object name to select its RS tag, so it shows in the Attribute Manager.
Right-click
Section titled “Right-click”Right-click a row for:
- Select RS tag(s) — selects the RS Object tags.
- Delete RS tag(s)… — deletes them, after asking.
Both act on every highlighted row when you right-click one of them, or on just the row you clicked otherwise.
Deleting tags
Section titled “Deleting tags”Delete Selected deletes the RS Object tags of the highlighted rows; Delete All deletes every listed tag. Both ask first, and both can be undone. Only the tags are removed — the objects stay.